Skeena Pacific Railway

   Dependable Service since 1876

The Railway - Year by Year - 1999 2000 2001 2002 2003 2004 2005 2006 2007 2008 2009 2010 2011

Track  and Roadbed Construction

Technical Pages

The Track

My garden railway is built with tracks that match what is called "Gauge 1". The rails are 45 millimetres (about 1.75 inches) between the rails. This equates to a standard gauge railway's 4 feet 8 1/2 inches, in 1/32 scale. There are a number of brands of track available, in Canada. I did most of my shopping at Art Knapp Trains in Surrey, just south of Vancouver. I settled on using LGB track and switches (turnouts,[USA] points [UK]) for a number of reasons, even though it wasn't the least expensive.

Just an aside, when you go shopping for track, remember there are a lot of different kinds and brands. Rail is described by its height (Code 250, Code 332). The "code" is just the height of the rail measured in thousandths of an inch. So, code 250 rail is .250" tall, or 1/4". Track is also differentiated by scale, that is whether the ties (sleepers [UK]) are sized and spaced for narrow gauge, metre gauge or standard gauge. You can lay brass, stainless steel or aluminum. Most garden railways use code 332 standard gauge brass for its looks, availability and ability to handle all the various equipment that runs on 45 mm gauge track. More about gauge and scale some other time.

Anyway, I decided to use LGB brass rail after seeing how it ages. I know, strange reason, but here's why. After the track sits out in the weather for awhile it changes colour (oxidizes) LGB turns dark brown, almost black, just like the big guys steel rails. Most other brands just stay their bright, shiny brass colour and stainless stays, well, stainless.
I didn't use aluminum as there are concerns about conductivity. Aluminum has a reputation for oxidizing more quickly than brass, resulting in poor power transfer between the rail and the locomotives. Obviously that's not a concern if you are using battery or live steam, but for track power, like mine, brass seemed to be the best balance of usability and price.


The two pieces of rail in this picture are about the same age (3 years). The curve to the left is LGB, the curve to the right is another brand.

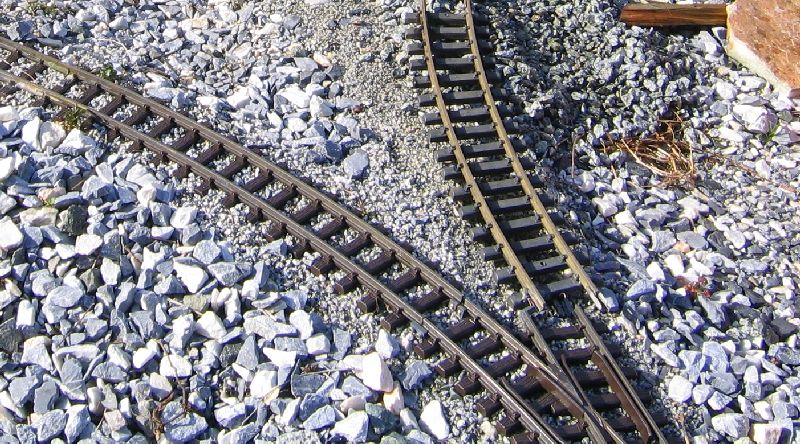
Both have served satisfactorily, but you can see that the LGB has turned dark and rail-like while the other is still brassy.


Connecting the Rail


 I use track power, control blocks, powered switches and lots of wire everywhere! The mainline is about 350 feet long with several passing sidings and yards. At one time, under construction, I had well over 200 feet operating from one power input. I believe that brass rail is as good a conductor as is necessary, as long as you make good track joins and use the longest sections of track that meets your needs. I solder my joins along the line and use rail clamps at the switches, or where I think I may need to lift out sections for maintenance, such as my tunnels. I have used several methods of getting heat to the rails so that solder will properly create both a mechanical and electrical connection. Some methods have proven better than others.
Using a small, pinpoint-type butane torch is often recommended. But the problem is, and what some people don't realize, is that both pieces of material to be joined have to be hot enough to melt the solder. Getting enough heat to the rail often results in singed or melted ties! Heating the connector (fishplate), because it is thin, is quite easy. The rail is much larger and absorbs a great deal of heat. The very best method would be to use what is called a 'resistance-solder' device. It's designed to put an electric current through the very metal you are trying to solder, thereby heating it up and getting the solder to flow. These units are expensive, as so many really good tools are. If you intend to scratch-build locos and cars using brass, the investment maybe worthwhile.
I came up with a similar method using a much less expensive unit. I have a Weller 200/260 watt soldering gun. It's important to have at least that much power. I have cut-off the end of the soldering tip and "tinned" the two ends for good conductivity. I then put one side on the rail-joiner and the other on the rail and wait for the pieces to heat. It doesn't take very long and no damage is done to the rail. Of course, the pieces to be joined need to be properly prepared. I use a small steel brush available in the welding department at Home Depot and use a lot of solder paste to make sure the join is clean. It also has to be mechanically tight, so squeeze the joiner in so that it clamps the rail tightly, if you need to. I've also found that thinner, electronic solder available from places like Radio Shack or The Source flows much more easily because it takes less heat away from the join. (pictures to explain this will be posted!)
Whenever possible, I solder my tracks together on the bench in sections 10 to 15 feet long. Theses sections are then soldered together, in place, as necessary. Switches are all connected to trackwork using rail-clamps. This helps in not damaging them when I decide to move something and I use isolating clamps where it is necessary for block control.

A method for Soldering Track in Detail

Laying It Down

 My track is laid using a base of 1/4 inch crushed granite that has been put into a 6 to 8 inch wide cut. The base dirt is tamped down and then gravel added and leveled to rough grade. The track is then leveled for grade and from side to side using gravel fines. For this, I have been using #2 chicken grit, available from the local feed store. I started using #1 grit, which is smaller and looks better, but it kept getting washed away in our wet coast weather! This method is generally called a float. The track 'floats' in the ballast, just as the full-sized railways do.
 In some places, where the track is hidden from view, track is laid on cedar 1"x4" by 8 foot long sections. The cedar doesn't warp, resists rot and doesn't let weeds grow between the ties.

A Track Plan of the layout as it is built as of April 2006


The Track and Roadbed

The Power

Maintenance of Way

Motive Power (locomotives)

Track Plan

Rolling Stock

  Home Tech Pages Home
This page was last updated on 05 May 2014.

Under Construction - We're working on the Railway

Skeena Pacific Railway is a wholly-owned, 1:29 scale subsidiary of  Skeena Pacific Consolidated, a Gilham Family  Enterprise.

 1/29th subsidiary
Our Pitt Meadows Weather Station is located at 2km northeast of  Pitt Meadows Airport

Skeena Pacific Railway

Bliss Bakery

Skeena Pacific Family Sites

1999 2000 2001 2002 2003 2004  2005 2006 2007 2008 2009 2010 2011
You can enlarge most pictures by simply "clicking" on them. Then use your "Back" button.  

For comments,  suggestions or corrections,  email the webmaster
These pages are the copyright 1976 - 2014.  Please do not copy without credit to
Skeena Pacific